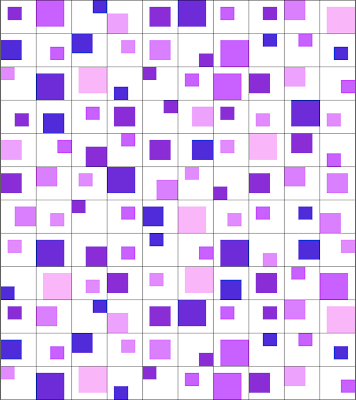
Tutorial -- Scattered blocks
 |
| Scattered Blocks Quilt |
The following instructions are for a quilt that is 10 blocks by 12 blocks or (after a wash and dry) 48" x 57". You will need roughly 1.25 yard of accent fabrics (in total) for this quilt. I'm sorry, I'm not quite sure about the sashing fabric requirements.
I will refer to accent color (non-white) and sashing (white) in the following instructions. Note, that Images A & B are NOT what I ended up making, these simply represent how I thought it through when I was originally designing the quilt (so the counts and placement in the images are just to give you and idea of what it will look like ... the actual placement, etc is up to you ;-).
Image A shows the basic design of the finished quilt. While Image B shows the detail of what the blocks are comprised of.
 |
| Image A |
 |
| Image B |
There are three sizes of accent squares: 2.5", 3.5" and 4.5". In my real quilt, for 120 blocks, my cut accent squares were roughly:
- 2.5" = 45 squares
- 3.5" = 45 squares
- 4.5" = 30 squares
 |
| Image C - each block is 5.5" |
There are 5 designs for the 2.5" accent blocks, so you will make 9 of each design. As there are 3 for the 3.5" block, you will make 15 of each.
Once all the blocks are made, your goal is to lay them out keeping three things in mind:
- color variability -- make sure you don't have two squares the same color right next to each other.
- size variability -- make sure you don't bunch all your 2.5" squares together for example.
- placement -- the accent color sides should not touch there should be sashing between them all -- the only exception to this is that corners can touch.
 |
| Laying the blocks out and looking for touches |
Once you've laid it out -- take a photo and look at it ... I laid the one out above and didn't see any blocks touching until I took the photo and then was able to see several instances where I needed to fix it prior to sewing. Amazing what the camera can help you see.
Once you've got all that taken care of ... simply piece it all together and you're set!
As I said, this wasn't an easy one to write ... so if you have any questions ... please feel free to leave a message below and I will add clarity for you (and everyone else ;-).
Have a great weekend.
Lisa
Thank you so much for writing and posting the tutorial.I love both versions you have made and was trying to work out how you had made them when the tutorial popped up. Love it.
ReplyDeleteThank you so much for doing this.
ReplyDeleteThanks for shareing you patterns quilters are so generous.
ReplyDeleteyor quilt looks so clean and fresh.
OK, quick clarification - you add sashing to create a 5.5" block, which will yield you a 5" finished block in the quilt? Ooops never mind my husband just suggested that I read more carefully (not that nicely!) and I see that you want a 5.5" finished block.....
ReplyDeleteActually ... you're correct ... it is 5.5" raw and the 5.0" once it's in the quilt.
DeleteThanks Lisa! This quilt is so awesome, but looks like a lot of work for my lazy butt! ;) I'll still make one b/c the end results are gorgeous!! And hey, isn't all the piecing part of quilting anyway? Wonder why I hate that part so much, but still like to make quilts?! Something is wrong with that picture I think!
ReplyDeleteGreat tutorial, Lisa! What program do you use to design your quilts? I use MSPublisher most of the time and I love what turning off the block lines does for the look of the quilt.
ReplyDeleteDeb, I use MS Excel ... it doesn't work for everything, but most of my quilts are pretty geometric, so I find that it helps me get a basic idea of what a quilt will look like and I can make adjustments before I start to cut. The block lines are created or dismissed with the 'border' tool.
DeleteI copied your blog post url and emailed to myself
ReplyDeleteI see I didn't leave a Thank You Comment that day
and now I'm back once again for yet another look at this quilt/block.
I love it's design and might just have what I need for a small quilt, say, laptop or just big enough for ME! to cuddle with.
Must Stash shop
thanks for the inspiring posts
hugs
Gerry