IKEA Billy bookcase do's and don'ts ...
Well ... I haven't been quilting ... because I have been building bookcases! Thought I might share a few do's and don't for those of you who are considering trying an Ikea hack. First ... I DO recommend doing it ... you can get some great looking shelves for a fraction of the cost of custom ... however, don't do what I did ...
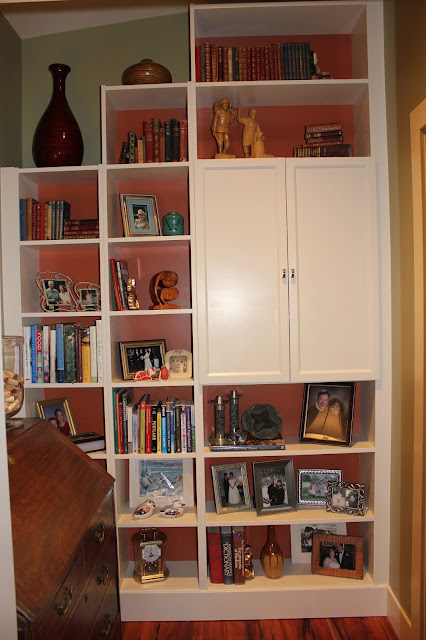
But before the story ... a finished picture or two.
 |
| Installed bookcase |
 |
| base of bookcase |
As many of you know, we have recently moved and made our vacation home our permanent residence. When we originally built, we had intended to build in bookcases in the small vestibule between our dining room and master bedroom. However, as usually happens in new construction, budget limitations at the end meant something had to go ... and it was our bookcases.
I had been perusing Pinterest since we moved out here and had seen a number of Ikea Billy bookcase hacks and was smitten. The relative low cost of Ikea coupled with a few pieces of trim and it could work pretty well. So one rainy day a couple of weeks ago we hooked the utility trailer up to the car and made the 2-hour drive to Ikea. After an hour shopping and another hour waiting in line to get out (not our most favorite shopping experience) ... we were on our way home with what we needed to build the main book case, plus a smaller one for my quilting studio.
I set to work right away ... turning the dining room table into paint central, I painted the backs with Red Cent (SW6341) which is the color that we have used on accent walls our entryway and guest room. I painted the rest Navajo White (SW6126) to match the trim throughout the house.
It was pretty easy to paint prior to putting together. I did two coats and the next day, we started to install them in the hall. Which is when we noticed that all we needed to do was touch them, and the paint was chipping/scratching off ... whaaaat!!!!
I got back online and Googled "painting Ikea cabinets" ... oops ... looks like you can't paint directly on top of melamine/laminate ... that was a painful learning experience. The following picture is my husband sanding 100% of the paint off that I had so carefully put on. I was not amused.
Here are two links to good articles on how to do it right ... here and here. Sanding helps ... but the real trick is the primer ... this stuff is GOLD!!! Zinsser BIN Shellac-based Primer ... do not try anything else ... there's no point ... this is the stuff. It's not cheap ... we paid just over $40 for a gallon of it at Lowes ... but I put two coats on everything and didn't even use a fifth of the can. I just rolled it on with a sponge roller as I did with the rest of the paint.
Anyway ... let's just say if you're going to paint the back of your cabinets red (or any different color for that matter), it is a whole lot easier to do it before you assemble the cabinets. We had already nailed the trim on ... so that was no longer an option.
The other key to making this work, from my perspective at least, is the baseboard. We have 5.5" baseboards throughout our house, so the cabinets had to be built up on a wooden platform so that they could carry the higher trim at the bottom. But as you can see in the photos, the baseboard trim goes a long way to making these cases look custom.
Final note, if you use your own door handles, I would recommend only using ones that require one screw. That hole is nearly pre-drilled all the way through. We had some extra pulls hanging around that required two holes it was not as easy as we had anticipated. We made it work, but in retrospect, I might have gone and bought two knobs ... but I really didn't like the ones that came with the doors.
In the end, we have gained a TON of storage space for just under $400 (see costs below). The cabinet doors hide the not-so nice looking books, magazines and papers and I am thrilled to have this project behind us and am ready to move on to the next one ... installing an Ikea butcher-block counter top (picked up at the same time) as my sewing table in the studio!
By the numbers:
- 1 BILLY book case 31.5 x 11 x 79.5" = $70
- 2 BILLY book cases 15.75 x 11 x 79.5" = $100
- 2 BILLY height extension 31.5 x 11 x 13.5" = $40
- 1 BILLY height extension 15.75" x 11 x 13.5" = $15
- 2 OXBERG Door 15.75" x 38/25" = $80
- Primer = $40
- Sandpaper/tack cloth/rollers/paint liners = $20
- Wood trim pieces = $24
- Red Cent paint sample size = $6
- Navajo White paint & door knobs already had in the garage = $0
Total cost $395.
Hope all is well with you and yours!
All the best
Lisa


Amazing results and thanks for the tip on the primer.
ReplyDeleteThat is awesome, Lisa!!! I love IKEA - just wish we had one nearer to us! It's a five hour drive to Atlanta for us....
ReplyDelete